Beginnings
When I was a little girl, my mother had a book on 18th century costume in the Williamburg collection. I vividly remember spending hours looking through this small book, and even tried to draw elegant looking ladies in wide pannier hoops, low décolleté and enormous wigs with pearls and fanciful birds perched atop. But then I forgot about the 18th century, and rediscovered it, only to be overwhelmed by the amount of information out there, and I assumed it would be many years before I was ready or able to tackle such a project.
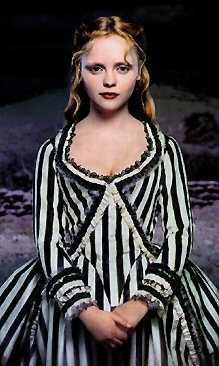
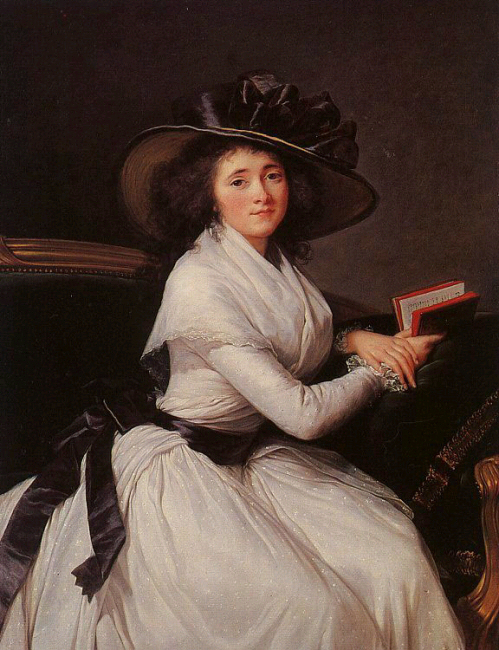
But then one day, I found some black and white striped cotton at Wal Mart (after the lead from my costuming friend, Jenni), and decided that now was the time to embark on this project. Soon after I was able to purchase a large box of basket-weaving reeds--including some half-round and flat reeds that were the perfect width for boning 18th century stays. At this point, I firmly felt that my next big project for myself should be 18th century--after all, I already had the gown fabric!! Plus, as luck would have it, several of my online costuming friends were also at varying stages of completion or planning in their 18th century gown project. So I decided to jump on the bandwagon and join in the fun! Because the fabric was a striking black and white combination, immediately the film Sleepy Hollow sprang to mind. Though I've never seen this movie, I had seen plenty of posters with the black and white gown Christina Ricci wears. The plan for my gown is rather different, but still, the jumping-off point and overall 'feel' for mine has distinct beginnings in this film gown. I pinpointed the decade I wanted this gown to be drawn from, and loved the latter half of the 1780s. I have done some research into portraits and illustrations from the mid-to-late 1780s, and have several points of inspiration from there as well.


(Sleepy Hollow cap courtesy Movie Mannequin; two final images on right courtesy www.marquise.de.)
The design I've come up with uses the 1" wide striped cotton; which may seem a little too wide, but I've got two things going for me with using the wider stripes. Firstly, according to my pictorial and written research, stripes of all widths and colors were popular at that period of time. Secondly, the wider stripes will be in proportion to my size, especially since they are high contrast colors.The cotton will be used for the bodice, sleeves and skirt. The petticoat will be a black cotton sateen (I haven't decided yet whether to leave it plain or do some manner of flounce or decoration along the hem). The bodice and skirt will be trimmed with a 1" wide black ribbon (forming a false 'zone' along the bottom of the former), as well as have a wider ribbon about the waist, forming a sash. The neckline will be filled with a filmy fichu and the cuffs will have a ruffle of the same material. To add a little color, I've decided to add a small cluster of delicate paper flowers at the neckline. They're a rosy pink, and are perfect for this gown (in fact, I bought them at an 18th century fair years ago!). My 'final' design (I'm a woman--I get to change my mind if I want!!):


The end-resulting gown will be worn for a costume party, but I still hope to achieve historical accuracy, as well as a hint of 'fun'. I'm hoping to play up the gothic (in the old sense of the word) aspect of the black and white combination, and will powder my skin to whiten it, do my hair in a 1780s style and powder it, use some dramatic eye makeup (probably black/greys) and wear blood red lipstick. In other words, it's going to look very theatrical, but impressive by candlelight. I would also like to eventually make a straw hat, similar to one show above. But this will most likely be completed after the party.
But, there is a catch! (Isn't there always??) This project is going to be any ongoing effort over the next year. I have three other 'must do' projects between now and next fall, so this one is definately a 'do when I have time' type endevor. But I hope that by this time next year if I'm not done, I'll at least be almost there!
So here's the list of garments I need to make in order to have this gown jump off the page and become reality (in order of wearing):
- linen shift
- stays
- rump or 'bum' roll
- plain muslin petticoat
- black sateen petticoat
- striped gown
- fichu & cuffs
- hat (pending)
Stays
The pattern I chose to use for my stays is the 1776 pattern from Norah Waugh's Corset and Crinolines. The material I've chosen is a brownish red linen/cotton with a faint jaquard pattern that I bought several years ago. It's not the prettiest goods (and rather different from my original desire for bright red stays!), but I have it, it's sturdy and will look at least presentable once the off-white stitching and binding is added. I'm also going to interline the stays with one layer of cotton canvas (also in my stash ;). The boning material is a new one that I'm very unfamiliar with, but hope to get good results from. I bought a large box containing varying sizes and cuts of basket-weaving reeds. In the box was a complete roll of 1/4" half-round reed, which I'll be using for the majority of the boning. For the center front, I have some very sturdy 1/2" wide flat reed that I'm thinking of doubling up for the 'busk'. If that doesn't work, I'll use my old busk standby: a wooden yardstick cut to size.
9-18-04
I scanned the stays pattern and enlarged them on my picture-editing program. This is the first time I've done this, and the results were very satisfactory; it took me less than 5 minutes to do what used to take me at least 30. I added seam allowances and cut the fitting toile out of the linen material I'll be using for the actual corset (I have 5 yards of the stuff!). Unfortunately, I don't have time today to actually stitch them together and fit them, so that will have to wait for another afternoon.

9-21-04
I made up the stays toile today, and have to say, I'm not that pleased with how it looks. As usual, I have the huge gap over my hips and the teeny-tiny one at the top. I didn't take pictures beacause frankly, I didin't really want to share it with the rest of the world. ;) Besides the gap issue, it's really too long in the back, and something weird must have happened, because the neckline is really low (we're talking almost to the bottom of my bustline)--and I know it isn't supposed to be that way. I may just persevre, and try to make this pattern work, or I think I might consider giving Mara Riley's instructions for using Elizabethan Corset Generator's pattern as a basis for 18thc stays. I've already made the Elizabethan corset, and it just needs a little adjustment at the center back (I decided no matter what the experts say, my corsets do need to be adjusted at the CB becauase I have a narrow back) and I can trace the 100% perfect pattern off my stays (since I stupidly forgot to do that before I constructed them...). I think I may do this--I'm just not excited about the 1776 C&C stays. I'm really disspointed because this is the first corset in like, two years that hasn't turned out relatively well during the first fitting. :p Ack. I think I need to go work on this before I eats at me any longer.
9-22-04
Yesterday evening I drafted a new stays pattern according to the instructions outlined in Mara's site, and made a toile of the resulting stays. I was very pleased with how these turned out; the fit was almost perfect (just needed to take a little off the back) and the shape was much more pleasing than the previous stays had been (sorry, no pictures). The shape is slightly more 1760s, but as the shape is still workable for the 1780s. So I'm going to go ahead with these rather than the Corsets and Crinolines stays. I'm rather dissapointed that those didn't work out, but I've found an alternative solution so my dissapointment isn't that great. Tomorrow I'm planning on spending the day sewing, so I will probably get the linen cut out for the stays outer and lining layers, cut out the cotton canvas for the interlining, and mark the boning channels on the latter. I still have to pick up thread for the boning channels, so I probably will not get any of that done before the weekend.
10-02-04
Here are some pictures of the original stays pattern I used (same one that I used for my Elizabethan corset), and the pattern after it had been divided, changed here and there, and the boning lines added.


I spent the week thinking about my boning dilemma and what to do about it. I e-mailed Mara Riley about my problem to ask if she had any advice. She said that as I had used the cable ties so sucessfully in my Elizabethan corset, I should use those in my 18th c. stays. But, I didn't need to fully bone them. So, I've still have to get some extra cable ties, and plot a new boning plan. Because I'm only partially boning them, I'll probably add an extra layer of the cotton canvas to interline the stays with (so the stays will be like this: outlayer of linen/two interlining layers of canvas/lining layer of linen). I'm probably going to put this project aside for a week and really work on the Buttercup dress (that one has a fast-approaching deadline! Yikes!!). Hopefully by next weekend I'll have a new boning plan cooked up and the extra cables ties and be ready to assemble and bone this thing!!
10-27-04
I have just one thing to say: I love reed boning!
I spent the majority of my morning and early afternoon measureing and cutting strips of half-round reed to bone the 18th century stays with. It took me around 4 hours (give or take 1/2 hour) to bone and assemble the stays, which is pretty good time, I think, considering they're fully boned.) I tried them on and here is how they looked...


(I'm wearing my mid 19th century chemise--haven't made the 18th century shift yet!)
The only things that need adjustment is that the front needs to be trimmed down about 1" as does the area under the arm (just a little too snug there). Otherwise, I love how the stays shape me--very period--and I stand up straight (I have bad posture in modern life)! The reeds seem to stand up very nicely, and are actually lighter weight than my partially boned Elizabethan corset. So, at this point, I have a lot of hand work. I think for the binding, I am going to see if I have enough white linen left over from lining my Italian gown and maybe use some watered down brown dye to give it a more natural or off-white color. These could be done much sooner than I aniticipated! So, what is left to do:
- trim down the front and underarm
- whipstich down the inner seams allowances to the stays
- attach the horizontal boning
- attach the lining
- trim the straps down to the correct length
- bind the edges
- work eyelets
Home | News | Diaries | Articles | Links | Site | Map | Contact Me
All Content Copyright © 2003-2004 Miss C.