 I've been drooling over the many beautiful Renaissance gowns that other seamstresses have created and posted pictures of online, but I always figured my Renaissance gown was a long way off from being a reality. However, when I was invited to go to a Renaissance Faire with some friends, I knew I had to dress up (who wants to be the only one in the group who's not??). So, I started doing some research at the time and asked a costuming friend for pointers (since she had just completed a gorgeous Italian Ren gown earlier this year). She was able to give me some really helpful pointers and got me started researching. I've listed some of my favorite research sites in the column on the left under "Resources". I purchased a blue jacquard fabric I found in the home decorating department of a local fabric store. It was a real find at only $4 a yard, since I was on a very tight budget. I'm not sure what the fiber content is, but it is certainly not totally a synthetic (I'm thinking maybe a cotton blend). While the fabric was quite stiff when I purchased it, once it had been washed and dried it softened up quite a bit. With the helpful prompting of my friend, I decided to go with the style that I loved. The picture on the top of the right-hand column is just like what I'd like to create. It was painted by Ridolfo Ghirlandaio about 1530, and I just love the puffed upper sleeves and fitted lower portion. My chemise will not be exactly like that in the painting (at least I assume the covering is her chemise peeking out), as I had already cut out a basic low necked chemise when I decided on the style. Oh well! Maybe at a later date I can re-do it similar to the one in the second picture down (on the rightside). I decided early on to start with the correct underpinnings so I could continue to build a Renaissance wardrobe without having to go back and start at the beginning. To start with, I made an Italian Camica from Festive Attyre. I used a simple cotton muslin (have I mentioned before I was on a budget?? LOL!). At first, I thought about using the Custom Corset Pattern Generator for the corset pattern (which is a great concept, if you ask me!!). I then changed my mind since the corset wouldn't look right under a 1530 gown (since this is right before the more rigid styles of the late 16th century). Instead, I simply drafted my own pattern using the instructions for a basic sloper at The Renaissance Tailor. Diagram I (below) shows the changes I made to the basic sloper shape. I had purchased some blue cotton denim to use, and happen to have some hemp cord in my notions drawer. I used Jen Thompson's instructions for using hemp cord as boning, which are very well written and helped greatly!! 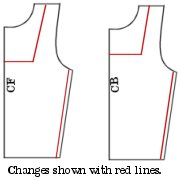 It literally didn't take much time to construct the corset and insert the hemp. I think I spent maybe 3 afternoons and evenings from start to finish (including drafting the pattern). The most monotonous portion of the construction was sewing all the channels for the cording! But, when I tried the corset on, fully boned, it was well worth all the effort. In the process of making the corset, I found I really hate sewing the binding on along the edges of the corset. Talk about time consuming and how sore my finger is from pushing the needle through the denim! (I honestly started to think I'd have a little hole in my finger from the way the eye of the needle kept digging in.) I did decide to be easy on myself and just buy some wide, single fold bias tape and use that to bind the edges. Of course I ran out of it. I could kick myself for not buying two packages, but the stupid JoAnn's near me doesn't post how much a packet is. Last time I bought some it was over $2 (and I only had $4 on me), but it was under $2 for the wide tape this time. Talk about annoying! The shift went well, though all those French seams take forever (I had to keep reminding myself why I was taking the time to do it right the first time! LOL!). It's a very loose style, and the sleeves are very long and full, so I decided to run a casing about 2" up from the end of the sleeve to pull the sleeve tighter around my wrist. I think it's going to look so good!! I used the same pattern that I made for the corset for the bodice (with a few changes, of course). I was careful when cutting out the jacquard to make sure a motif was centered on the bodice front and back (which makes it look really good! LOL!) I used a simple cotton muslin to line the bodice and ended up edgestitching that by hand to the bodice fabric. I left the right side seam open (having seen that in several period paintings) for lacing. I made a row of eyelets on either side using a matching colored silk thread (which was heavenly to work with, by the way In the course of sewing this, I realized that I'd probably melt, faint or something equally horrid with those heavy sleeves attached and no way to take them off in the course of the day at the Faire. For health safety's sake, I made the decision to forgo the sleeves for the Faire, and made them at a later date. I'd rather not have a serious over-heating problem, thank you very much. LOL! However, the gown still looks smashing without them, and actually looks more like the painting at the bottom under "Inspirations" (at right), which is what I really wanted in the first place. Click here to view the pictures of the finished garment. After all the rushing around and work I put into the outfit, I think it was well worth the effort. I literally finished it just days before the Faire. Since the Faire was in the summer, I knew it was going to be hot, but suprisingly I didn't get too hot in the outfit (even considering the fact that the fabric was heavy!). I believe this was due to drinking a lot of water throughout the day (in fact, I've heard it's very dangerous when you're in period garb not to keep hydrated!). I got some compliments on my outfit, and I think I was probably the only one at the Faire with a lower middle class Italian Renaissance gown on (my friend who also dressed in Italian Renaissance had a much fancier gown that I! ::sigh:: Home | News | Diaries | Articles | Links | Site | Map | Contact Me All Content Copyright © 2003-2004 Miss C. |
Modified March 1, 2004 Contents Inspiration 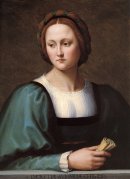 This painting is from 1525, and a style of gown that I'd really like to make. Image courtesy of Festive Attyre  A very regal gown from 1533. Image courtesy of Festive Attyre 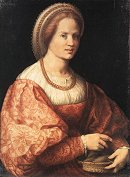 A slightly earlier gown than those above from 1516. Mine will be similar because of the fabric choice. Image courtesy of Festive Attyre 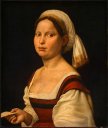 This painting is from 1525, and a style of gown that I'd really like to make. Image courtesy of Festive Attyre Supplies ° Silk thread ° Eyelets; silver ° Cording ° Denim, 1 yd. ° Hemp cord ° Muslin; 5 yds. Sources Resources ° Jenny La Fleur ° Elizabethan Costuming Page ° Renaissance Tailor |
 ). What relieved the monotony of doing upwards of a dozen eyelets was watching Pride and Prejudice. I dare say I wouldn't have gotten through them as well without it!
  I used hooks and eyes (very un-period, I know) to secure the skirt on the open side of the gown. Voila--a beautiful gown! Oh, and to those that are wondering: Yes, you can see a small sliver of my corset on the lacing side, but it really isn't noticeable since the corset is almost the exact color of the gown. Plus, the large sleeves of the shift help hide it! (Which brings me to another point).
 ).
).