
Click on thumbnails to enlarge.
The seasons show s a wide variety of ways of finishing the neck of coats, from the so-called collarless effect-which however, always has some sort of flat band or collar effect-to the man's notch collar and the rolling collar and revers extending to the waist. These all require a foundation of canvas. The flat band collars being interlined with French or dressmakers' canvas; the shaped collars that need to be worked into shape by the quilting or padding stitch that is used in the construction of men's coats, should be made of tailor's canvas and cloth, like the coat, should be made of tailors' canvas on top and afterward covered with a facing of cloth or of contrasting material. Tailor's canvas is much softer than the French canvas, but if more loosely woven and has more body.
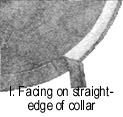
Illustration I shows the way of finished the edge of the collars of a loose pattern coat that may be made of silk or light cloth. No canvas is used in the construction of this collar and unless made of very thin material, it is unlined. If a lining were used, the edge of the collar should be turned under a seam all around and basted and the lining, cut exactly like the outside should be turned under in like manner and its edge hemmed to the turned under edge of the collar. When, however no lining is used, the collar must be faced, and this is best done with a bias strip of the same material, or of silk in the same color if the coat is of cloth. Cut the collar as directed, with the perforated edge of the pattern on a lengthwise fold of the material, then open the collar and lay it smoothly, with the right side of the good uppermost, on a piece of crinoline. Cut the crinoline around the outline of the collar and baste the two together around the edge. Turn the collar over and cut the crinoline away from the center, leaving only three-quarters f an inch forming a band all around the collar except at the neck edge. Turn the collar and crinoline over a seam toward the wrong side and baste it. Turn under one edge of the bias strip and baste it to the turned-over edge of the collar, stretching the bias strip on the one edge to make it lie flat with little if any fullness on its upper edge. In order to allow for this stretching, the bias strip must be one-half inch wider than the facing is to measure when finished, as stretching the bias tends to make it narrow. Turn under the upper edge of the bias strip all around, making it measure evenly thee-eighths of an inch and hem it by hand to the collar, taking a very small stitch into a couple of threads of the collar and not drawing the thread tight. A tow of machines stitching may finish the edge of the facing instead of the hand hemming or, if preferred, several rows of machine stitching may be made around the collar after the edge is turned over and before the bias strip is applied as facing.
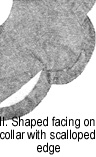
Illustration II shows another outline of the same collar made by cutting out at the perforations found in the pattern, to be used if one prefers the scalloped outline. For a shaped edge running up into V's, where it would be difficult to turn under the edge neatly, another method of applying the facing is necessary. Baste the crinoline to the edge as in the first case, then lay the collar on a piece of cloth of corresponding size, the right side of pieces of material facing, and baste around. Stitch the seam around the edge, running it evenly into the V's between the scallops and including in it the two layers of cloth and crinoline. Cut the cloth around the outline of the collar and clip the seams in sharply at each V, then turn the collar and the facing material, bringing the seam to the inside as in a bag. Baste around the edges and cut away the cloth at the center as the crinoline was cut, leaving the facing a regular width all around, following the same shape as the edge of the collar. Smaller pieces of the material may be used for this facing instead of one large piece, if they are neatly joined together and the seams pressed open
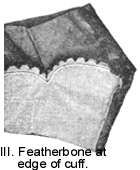
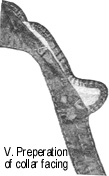
The large cuff seen on this coat may serve as a model, as may the cuffs of similar style. Two pieces will be required for each cuff. The outer piece or cuff proper may be of silk, cloth or velvet, either matching or contrasting with the coat material, and the second piece or lining should be of silk. The entire cuff should be interlined. The shape may be better preserved if featherbone cord is introduced at the edges. When the cuff is cut in the simpler outline the cord is introduced into the turned over edge of the cuff and crinoline and the cuff lining is hemmed to the turned over edge as described for the facing illustration I, but when the cuff is cut is cut into the scalloped outline, necessitating the "bag" seaming of cuff and lining, the cord should be caught to the crinoline after the edge seam has been stitched as shown at illustration III. Another way of introducing the featherbone is to cover it and use it as a visible cord edge, introducing it into the seam in the manner shown at illustration IV. In this case the collar should be corded to correspond using plain cord the same size instead of featherbone. Illustration V shows a fancy collar facing to be applied to the neck and front of a collar.

The coat should have its first fitting before the collar facing is cut and if any alteration is made at the shoulder seams, corresponding alterations should be made on the pattern at the shoulder line, that is marked by large perforations. If the coat is drawn up at the shoulders, making the shoulder seam deeper, the pattern of the facing should be folded across at the line of large perforations and a tuck should be pinned in, the size of the extra amount that has been taken up in the shoulder seam. If, on the contrary it has been necessary to let out the shoulders seams, cut the facing pattern across the line of perforations and separate it the necessary amount. If the neck of the coat is trimmed out any, the same amount must be trimmed out at the neck edge of the facing. At the second fitting, have the collar facing from French canvas. Fit it to its proper position on the coat. A littler stretching at some point may make it conform better to the shaping of the coat, but be very careful not to stretch it out of shape. The canvas should be used as a pattern by which the facing should be cut from its material, allowing the three-eighths of an inch all the way around and turning it over the edge of the canvas. The turned edge should be nicked at in curves and on round edges it may be made to lie flat by gathering the edge. This, together with the underfacing, which should be cut like the outside, its edges turned under and hemmed to the turned over edge of the outer material, is seen at illustration V. The model illustrated is pattern 9271, and the same general instruction applies to other collarless coats which are finished with collar facings.
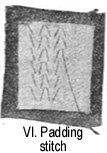
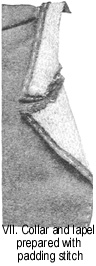
 In this case, the front edge of the coat may be rolled back, and in making provision for this the part that is to be rolled back must have tailor's canvas applied underneath and attached to the cloth by padding stitch and must then be faced with the cloth of the coat, or with a contrasting material the same as the collar facing. Padding stitch is used by tailors to hold the canvas and cloth closely together. A detail of the way it is done is shown at illustration VI. The canvas is geld uppermost and the two materials are rolled over the finger as the work is done. Begin at the fold of the collar or lapel and work toward the edge. Take the stitch through the canvas and very lightly into the cloth, so that it may not show through. When the padding stitch is finished turn the edge of both cloth and canvas and fir the underfacing over the canvas, turn under its outer edges and fell it down to the turned over the edge of the coat. The cuff may be made in the same way as the collar-facing and slipstitched to the sleeve. The collar and turned over lapel on the front of coat 1286 that is seen on so many plain tailor made coats. Canvas is place in the front of the coat and from the fold line of the lapel, which is marked on the pattern by perforations, the canvas and cloth are "padded" together, as seen at illustration VII.
 The collar is cut like the pattern from canvas and clot and the two are held together by padding stitch, though some tailors in order to save time, stitch the portion of the collar that is included between the curved line of the perforations and the edge that is to be attached to the neck, using the padding stitch on the turned over portion. The collar is then basted to the neck of the coat according to the notches, it do reach the edge of the lapel and this corner turns over, forming with the turning of the collar, a continuos line that lies flat on the coat and makes the notch collar. The cuffs for a plain coat of the sort should be interlined with French canvas and faced with silk. Baste a bias strip of canvas into the wrist of the sleeve, as was described and illustrated in The Designer for September, turn up the bottom of the sleeve the allowed hem amount and mark the fold edge with a colored thread. Slip the cuff over the hem of the sleeve, bringing the marks in the cuff to the correct possession in regard to the seam (following the direction on the label of the pattern), and placing the lower edge of the cuff a seam's width above the colored thread making the sleeve length. Baste through the cuff and sleeve a seam from the cuff edge as shown at illustration VIII. This will bring the sewing line through the colored thread. Stitch the seam, press it flat on the cuff and hem the cuff-facing over it. The hem of the sleeve is then turned under and the cuff turned back on the sleeve and tacked at it's upper edge if necessary to hold it in position
When the sleeve lining is placed on the sleeve, it is not brought down to the edge, but is felled over the raw-edge of the turned under hem, leaving about three-quarters of an inch of the cloth showing on the inside. This leaves the sleeve (which has been cut the same as the outside, less the em) three-quarters of an inch longer than the cloth, and this allowance will give the necessary "case" to the lining.

Some of the season's coast show a mannish best with turned-ver lapel, and this must have the fronts canvassed the same as a coat. The lapel and cloth are "padded" together and then faced. The fronts of some of these coats that show a vest are finished with a rolled rever collar somewhat like the collar on a man's Tuxedo coat. These revers are in some cases cut in one with the fronts of the coat, while in others they are applied; in either case the collar should be canvassed, and after fitting, the canvas and cloth should be closely worked with the padding-stitch and the facing applied over the turned-back rever.
In making the padding-stitch, care must be exercised, if the cloth is rather thin, to prevent the stitch from showing through it. The quilted effect the stitching sometimes caused on the cloth itself may be pressed out by using a moderately hot iron, if a damp cloth be first placed over the cloth of the collar or revers.
Note: This article was taken from a 1905 issue of The Designer. The techniques describe here have not been tried, and therefore Across the Ages cannot vouch for their work-ability.
Please contact the webmaster if you are experiencing any technical difficulties with this site.
About
Additions
Articles
FAQ
Feature
Links
Poll
Reviews
Resources
Sewing
©2003 Across the Ages