

Many vintage patterns are too fragile to handle for sewing purposes. Yet, they have a certain vintage charm or give us a totally authentic look from the period. How can you preserve a vintage pattern while being able to use it? Below are a few suggestions.
Method One
To preserve the original pattern pieces, you will not be using those to pin to and cut out your fabric. Instead, you can use a non-fusible, non-woven interfacing to trace the original pieces and markings onto. First calculate how much interfacing you need to purchase by laying the pieces out on your cutting board (making sure they come within the 45" width) and add an extra half yard to the final amount needed. Do not go by the amount on the back of the package, this amount is only for the finished project, and you need to cut out multiple pieces of the same pattern piece. You only need one copy of each piece for your interfacing pieces.
To trace the pieces, lay them out on a flat, solid colored surface (if you use a gridded cutting board, turn it over to use the solid back). Then, lay the interfacing over top those pieces, pin the interfacing to the vintage pattern pieces to ensure they don't shift during the tracing process. Always use a pen or dark pencil that won't bleed through the interfacing!! (Be sure to test this on a scrap of the interfacing beforehand.) You can easily ruin older pattern pieces when ink bleeds through.
Be sure to be careful to stay true to the edge lines of the pattern. I would recommend having a regular ruler on hand for straight edges, and a French curve for curved edges. (If you don't have a french curve, this may be a good time to purchase one as they're invaluable!) For the long, straight lines of the skirt, I would use a yardstick to make the job easier.
Method Two
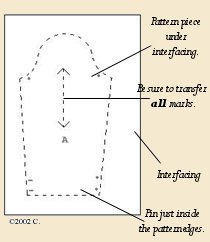
This method is a little more hard to do, and requires a steady hand. However, it's great if you're tracing a unprinted pattern (mostly patterns pre-1950). Pin the pattern pieces to the interfacing you're using, and mark any notches, dots, etc. carefully on the interfacing. Carefully cut around the pattern piece (being careful not to cut the pattern) on the interfacing. Be sure you're using a sharp pair of scissors. Unpin the pattern.
Techniques for Both Methods
When you've finished tracing/cutting your pattern, be sure to transfer all marks (darts, notches, dots, grainlines, etc.) to the interfacing. Also note down the pattern, year (if you know it--if it's not on the pattern envelope, I've sometimes found it on the pattern instructions), size and piece number/letter.
Because the instructions included with most patterns are somewhat brittle, don't take any chances in destroying those; photocopy them to have a copy you can use. Also be sure to photocopy the front and back of the envelope--photocopying the cover in color is a good idea (the rest can be in black and white). I store my traced patterns (not the originals) in resealable plastic bags, with the front cover copy clearly in view. You might also consider copying an extra front and back envelope cover to staple to the instructions for easy reference.
This is really an easy process once you get started. This way, you can preserve the original pieces for a future seamstress while still being able to use it yourself.
Artwork is October (1877) by James Tissot, courtesy of CGFA.
About
Additions
Articles
FAQ
Feature
Links
Poll
Reviews
Resources
©2003 Across the Ages