


This apron is based on ones seen in several Regency era movies. It's simple to make and is completely customizable to your size. Feel free to let me know how these instructions work for you!!
Supplies: Cotton for apron (muslin, print, or light fabric for a more fancy apron), two buttons (optional), matching thread, paper for bib pattern, tape measure, rulers, pencils, marking chalk or disappearing ink, scissors, needles, pins, etc.
Note: Use a Ẅ" seam allowance unless specified otherwise.

1. Measure for the bib:
a. Measure from where you wish the top of the bib to rest (1/2"-1" from neckline of your Regency gown), over the fullest part of your bust, and ending just under the bust.
b. Measure the width of your bib by measuring from shoulder to shoulder across the front.
2. Measure for skirt and waistband:
a. From just under your bust, measure to just past your knees. This is the length of the skirt.
b. Now measure around your hips, adding 8"-10" to that measurement (i.e. 38" hip + 8"= 46"). This is the width of the skirt.
c. Measure around your torso, just under you bust.
--Add 4" to that measurement if you want a overlapping button closure in the back.
--Add 32" (16" for each side) if you want ties.
3.
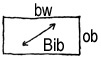
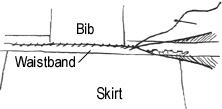
a. Make the Bib pattern: Make a rectangle using you over-bust (ob) and bust width (bw) measurements, per the illustration. Add Ẅ" on all sides for the seam allowance; mark rectangle to be bias cut.
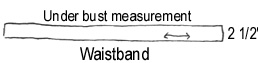
b. Make waistband/tie pattern according to the measurements you took in 2c by 2 Ẅ" wide (i.e. 36"x2 Ẅ"). Add Ẅ" on all sides for seam allowance; mark grain-line direction per illustration.
4. Cut out bib (two on bias), waistband (two). Measure and cut out skirt: measure the length and width (2a and 2b) and add 1" to each side.
5. Sew apron:
a. With right sides together, sew three sides (both short and one long) of the bib together. Grade seams and clip corners. Turn right side out and press.
b. Hem both long and one short (this will be the bottom of the skirt) sides of the skirt as follows: Iron under 3/8" and then 5/8" (enclosing the 3/8"), mitering corners. Whip-stitch in place.
6. Sew waistband to skirt (note: when you are sewing the waistband to the skirt and bib, use a ẅ" seam allowance):
a. Run gathering stitches across the top (un-hemmed) edge of the skirt); gather so that it is the width of the bottom edge of the bib, plus 5" on either side (i.e. width of bottom edge of bib=18"+5"+5"=28"); secure gathering in place.
b. Match center of skirt to center of waistband. With right sides together, sew skirt to waistband; starting and stopping at edges of skirt.
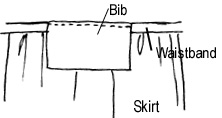 c. With right sides of the top of the waistband (the long edge that is not sewn to the skirt) and the bib together, sew.
d. Press seam allowances toward the center of the waistband, and turn under a scant ỳ" on both sides to encase the raw edge. Continue turning under the rest of the waistband, maintaining the same width along each side. Be sure to turn under short edges on waistband Ẅ". Whip-stich the waistband to secure turned-under edges.
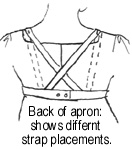
7. Now, try the apron on, pinning the corners of the bib up. With someone's help (believe me, you can't do this step by yourself), measure from the top of the bib, over your shoulder, and to the top edge of the waistband. This will be the measurement of the shoulder straps. (Note: If you want the straps to cross over in the back, make sure you cross the tape measure when you measure to get the correct length.) Add 2" to this measurement, and cut out two rectangles the length of this measurement by 3" wide.
8. Fold one of the shoulder straps in half lengthwise, and sew using a Ẅ" seam allowance, and sewing closed one of the short ends. Turn this tube right side out and slip stitch the open end closed. Press so that the seam-line is along the underside.

9. Measure in ẅ" from the edge of the top edge of the bib, Place the shoulder strap here and so that Ẅ" is underneath the bib (see illustration). Stitch in place by machine or hand.
10. Sew the free short end of the strap to the waistband, 2" from the end (or if you are doing a tie waistband, 16"). If you are doing a cross-over strap, be sure to sew the strap to the opposite side that the strap is attached to the bib on (see illustration).
11. If you are doing a button closure, overlap the edges 2", and mark for two button holes. If you want the apron to be period, I suggest working the button holes by hand.
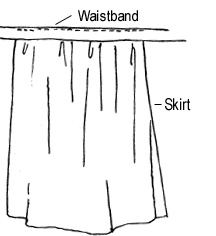
Your apron is now done! Click here to view an illustration of the finished apron. You can add pockets to the front or embroider it if you wish. Enjoy! Feel free to drop me an e-mail if you have any questions!
Artwork is October (1877) by James Tissot, courtesy of CGFA.
About
Additions
Articles
FAQ
Feature
Links
Poll
Reviews
Resources
©2003 Across the Ages