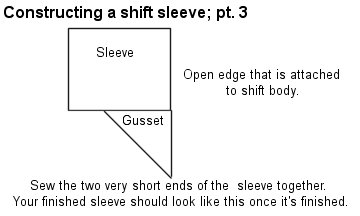
 I had been toying with the idea of an Empire gown for some time, but an invitation to an event gave me the needed push to put this project in motion. One of my goals was to not only have a dress that was of period cut and style, but also the appropriate undergarments. This would take time, but it also means that once I have the basic foundations in place I can continue to build upon those with subsequent gowns. The Empire period is quite broad, roughly 1800-1820 and the myriad of styles is overwhelming. To help me focus on what I wanted, I whittled it down to the five years I admired most: 1800-1805. Heavily influenced by the classical ideal of the period, simple and at the same time flattering. It is the period that to me, is very appealing since I don't generally like a lot of ruffles and such. There are many styles in this period, and I have a wide range of ideas to pull from for my gown! It should be lots of fun. To view the research page, please click here. The research page is only intened to be a general overview of the period, in particular the garments I'm making. I've included links to other sites if you would like to do further research. Under garments are essential to achieve the correct silhouette for the Empire period. Although I've heard of various methods to achieve this look besides a corset (one of which is the bodiced petticoat), I wanted to have something that was appropriate, and I've been itching to try making a corset from this period! Shift I used approximately 3 yards of 36" wide muslin (available at stores like JoAnn's). I measured from where I'd like the neckline to be to just past my knee to get the front and back measurement; though an easier method would be to measure from your shoulder to knee (adding enough for a hem) and deduct the length of the sleeve (my sleeves are 8") and therefore arrive at the correct length measurement. I measured over my shoulder to determine the shoulder strap length (having a friend help with this measurement is a plus!), and the gusset was just guesswork. The first thing I did in the construction process was to turn the upper edges of the shift body under twice (once Ľ" and then another Ľ") and iron it well. I then created two eyelets about ˝" apart in the center of the turned-under portion on each chemise. I made sure that the eyelets were only worked on the turned-under part of the upper edge, and did not go through to the outside of the shift (clear as mud, huh? 10 | 24 | 03 To do the shoulder strips, I simply folded each one in half lengthwise and ironed it flat. I then sewed either of the short ends (don't unfold the strip) to either far edge of the front piece and the corresponding back. Make sure you sew it so that the folded edge is towards the neck, and the raw edge is where you'll sew your sleeve to. The construction of the sleeves is a bit confusing, if nothing else because you are using a square gusset. I found that before I started construction, folding and ironing the square in half to create a triangle helped me immensely during construction. It's rather hard for me to put how to construct the sleeve into words, so I've included some diagrams below (click on thumbnails to enlarge): 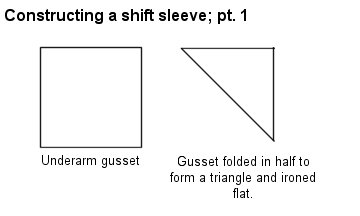 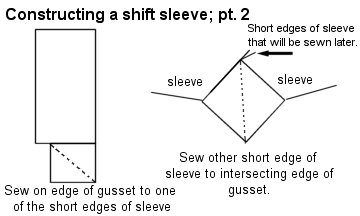
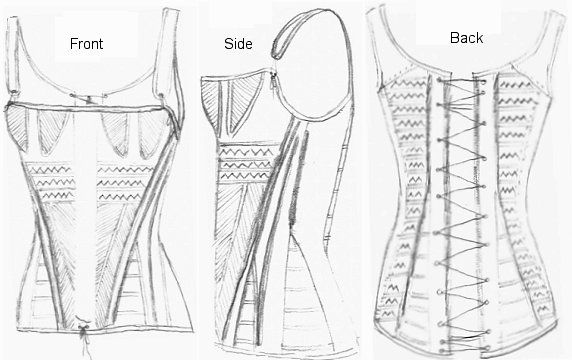
 Now, I must point out here that throughout construction of the whole shift, I used flat felled seams (like the kind on jeans), which are very strong and enclosed (no fraying!!). After I constructed both the sleeves, I attached each to the shoulder piece (remember, attach the large open side to the shift!); although I didn't finish the sleeve/shoulder seam with a flat fell seam then. At this point, the shift had the shoulder strips, sleeves, but the side seams were open. I sewed both side seams up, and then did a flat fell seam that finished off the side seams as well at the sleeve/shoulder seam (just do one continuous seam). Piece of cake! One thing I cannot stress enough is that you try on the shift after you attach the sleeve (before you flat fell them) to ensure that the gussets are the correct size. My first pair of gussets were too small, and then the next ones were too large. 11 | 3 | 03 Stays A little background on the corset pattern I'm using: I chose to use the 1805-1825 stays pattern from Period Costumes for Stage and Screen by Jean Hunnisett as I had the pattern readily available, and it meant no outlay of money for purchasing a pattern such as The Mantua Maker pattern. The added bonus for me was that the pattern was scaled, and for some reason scaled corset patterns don't intimidate me as much as full-scaled patterns. (Odd, I know, but I had a rather negative experience with a commercial corset pattern, and have preferred scaled ones every since.) Scaled patterns are quite easy to enlarge, and there are three methods that I know of: enlarging it by hand using paper with 1" squares; using a projector to enlarge the pattern onto a large piece of paper secured to a wall and then the lines projected transferred onto the paper; or lastly, enlarging it using a photocopy machine. I use the latter because I have a copy machine readily accessible, and because it is quick. To enlarge a scaled pattern on a photocopy machine, I simply copy the page with the pattern first (imperative that you do so, since we'll be cutting up the page, and you don't want to ruin your book!), and cut off the 'ruler' or scale on the page. I then just experiment with different percentages of enlargement until I get that ruler scaled up to actual size (e.g. a '6" scaled ruler' is enlarged to be exactly 6"). I then know the percentage to blow the rest of the pattern up at. It take a little work, and I usually have to draw reference lines over the scaled pieces before I enlarge them since they usually don't fit onto an 8 ˝" x 11" sheet. I recommend you use this method for normal sized sleeves and bodices only, since skirts would be a waste of paper and ink due to their usually large size. I recommend using the hand scaling method using graphed paper (or graphed interfacing; just make sure the squares are 1"). So see--scaled patterns aren't that hard once you hit upon a enlargement method you think you can work with. Fortunately, the stays from Period Costumes for Stage and Screen were just about the right size for me when they were full size. I'll probably add and inch or two for 'play' before I cut the muslin out; better too big than too small. To stiffen the stays, I'm using a combination of cording and spring steel boning (the kind that looks like a flattened coil, for those of you not familiar with boning types). The original stays do have some minimal cording, but I wanted to reduce the boning by a few pieces and rely a little more on the cording, which meant altering the cording amount and pattern. I've been able to get close to some stays from the period, and have found that corsets with the heaviest amount of cording tend to be those closer to the 1820s. Because these stays span 20 years, I feel that I can beef up on the cording and still be within historical reason. I'll be removing the side-back bones and replacing them with a cording/quilting combination down the back to offer back support and improve my posture. I will also be cording the hip gussets lightly with a row of cord every ˝". The front of the stays will be heavily corded to offer the most figure support with cording down the front on either side of the busk. The bust gussets will also be corded, only I'll be using a cotton cording instead of the hemp used on the rest of the corset. See the reference drawing of the cording/boning plan. Thick, dark lines on the sketch indicate boning. This is subject to change of course; I'm seriously thinking of eliminating the cording across the hip gussets, but I've not come to a firm decision yet. 11 | 10 | 03 To put the gussets in, I used a combination of the instructions on So Much to Sew…So Little Time and those in Period Costumes for Stage and Screen. Very easy to do, and not as difficult as I had heard they were. Here are a couple things I noticed while making the initial toile that one might want to take into consideration: 11 | 17 | 03 Speaking of busks, I ran into the oft-encountered dilemma of what to use for a busk in my corset. I seriously thought of going out and buying a piece of thin wood and shaping that to create a busk. While the most period correct option, I didn't want to waste time doing that, and frankly, I don't like woodworking that much (I can do it, just don't like it). At first I thought a 12" wooden ruler (the kind without the metal edge) wouldn't work, but upon further testing, it proved to be the correct length for me. Another option I did consider (before I found out the 12" ruler would work) was to purchase a wooden yardstick (available at hardware stores) and cut it down to the correct size. One thing I've noticed throughout trying the stays on is that it really improves the look of the gown. I tried my 1830s dress as well as an earlier Empire dress (made using the Sense and Sensibility pattern) and I couldn't believe how well the styles looked on me! While they never looked terrible before, having the proper undergarment on really took it from frumpy to fab! I cut out the stays in two layers of twill and marked the boning channels and such on the twill that would make up the lining. I'll probably end up throwing the unfinished corset in for a quick wash before I insert the boning to get the pencil marks off. One word of warning though: always use the old fashioned kind of pencil, not a mechanical one. The latter leaves permanent marks on fabric that never comes off (trust me on this!). Although I had some spiral steel boning from a previous project, I didn't have enough or the right sizes. I ended up ordering from Farthingale's, a Canadian supplier that is very pleasant to work with. Their prices beat most US merchants, especially since the exchange rate works in my favor!! Mwuhahahaha! I decided that in the construction of my stays, I didn't want to enclose the seams as I had done before on other corsets. I instead chose to flat line the whole thing (so the seams are exposed on the inside) and whipstitch over the raw seam edges. I think it will hold up well since the twill is a very firm weave, and it will allow me to take in or let out the seams if I ever need to. Since I'm going with this method of construction, I basted each piece with it's lining piece, wrong sides together along the edges (except for the back pieces; the back seam needed to be sewn before the other edges were basted together) before doing anything else on the stays. I next corded the front piece of the stays. Although I had thought about just waiting to do that after I had sewn all the pieces together, I really, really wanted to see how the cording looked! I basically used Jenny la Fleur's method of inserting cording; I did several things differently though. Firstly, I was working with cotton cording (decided to nix the hemp cord idea since I didn't have the right size, and cotton cording is period) and used a needle instead of a hook fashioned out of wire. But, before I could do any of the cording, I need to sew the cording channels. Since my cording was very narrow (#3 crochet cotton), I needed my channels to be about 1/8". Instead of marking each and every sewing line, I simply started by sewing Ľ" channels (roughly following the edge of my presser foot; but you'll want to check the distance between the needle and edge of the machine's presser foot since it varies), and then sewed between the Ľ" channels to form 1/8" channels. Worked perfectly. To cord the channels: I carefully moved threads and poked a hole at either end of a channel with a metal awl (since I'm using twill, a bone awl would have been no use), making sure I didn't tear or cut any threads. I then threaded a long piece of cord (you'll find out why in a moment) on my needle (which is about 2"-2 ˝" long; a 'sail needle' I believe) and drew that through the channel until the ends were almost to the hole. I then snipped those ends and drew the cord through the hole so they just disappeared. Then the cord was cut close to the other end of channel and it usually sunk into the channel (although from time-to-time I had to help it with the awl). Very easy! With one long piece of cord, it really cut down on the time it took to rethread the needle again and again. I took pictures of the process, so they should be added here soon. The bust gussets were sewn in next, which was a bit of a challenge sewing through all those layers of twill! (Always put a heavy needle in when doing more than two layers of twill.) They went in with a bit of a fight I also managed over the weekend to finish the front piece completely and move onto the rest of the corset. The only task on the front I had left after the bust gussets was the quilting in the ˝" spaces between the four channels underneath the bust gussets (there were three ˝" spaces, and I quilted two, leaving one plain) and work the eyelets at the bottom to hold in the busk. For the rest of the corset, I assembled the whole thing and have begun to work on the cording and quilting on the back. It's a lot of tedious machine sewing and handwork at this point, but I'm so excited to see how it's turning out! I've estimated I'm roughly 1/3 of the way through the stays at this point. 11 | 25 | 03 I've changed my cording design somewhat. Instead of quilting between all the channels as indicated on the stays diagram, I quilted every-other-one. I also haven't decided if I want to take the cording channels to the other side of the bone that runs down the back piece-it looks just as good without it. ;) I'm planning on doing the same cording and quilting on the hip gussets this week. Other than that, I didn't make too much progress. I still have a fair amount of handwork left, so I'm hoping I can meet my early December deadline (ideally I would be finished by December 1st, but with Thanksgiving this week I highly doubt it). I'm waiting for my boning order still, so that could conceivably hold me up as well. Farthingale's is usually very quick, but it's been almost two weeks and no order (I opted for quick shipping too). But, aside from that hiccup in the order of things, I still have to cord and quilt the hip gussets, finish the inner seams, insert boning, bind edges, work eyelets on straps, and insert busk. I hope I'll be able to get to a large chunk of that this week, but it seems my 'sewing bug' is dying down. Oh well… Holiday season always makes me a little stressed, and I really think that having a large project like this one doesn't help to calm me any! LOL!! 12 | 10 | 03 All I need to do is cut a busk (the ruler idea won't work after all; it's about ľ" too short), shorten the shoulder straps, and bind the edges. I'm very glad it's done-now I can work on the dress. I'll be taking pictures of the corset once it's completely finished and posting them here. Stay tuned! 12 | 15 | 03 12 | 24 | 03 Home | News | Diaries | Articles | Links | Site | Map | Contact Me All Content Copyright © 2003-2004 Miss C. |
Modified March 1, 2004 Contents Supplies ° Muslin, 3 yds. ° Crochet cord, sz. 10 Corset ° Twill, 2 yds. ° Cotton cord, #3 ° Boning ° Wooden busk ° Twill tape Sources Resources ° Jessamyn's Regency Costume Companion ° Regency 1 ° Regency 2 ° Regency 3 ° Regency 4 ° Regency 5 ° Regency 6 ° Regency 7 ° Regency Clothes ° Regency Garderobe ° Regency Fashion Page ° Sense & Sensibility Vintage Images Books to Read Costume in Detail by Nancy Bradfield Patterns of Fashion 1 by Janet Arnold Period Costumes for Stage & Screen: 1800-1909 by Jean Hunnisett The Cut of Women's Clothes by Norah Waugh Movies to Watch Thanks to my friend Jenny La Fleur for help with editing the research page. |


 Feel free to use my diagram as a guide to create your own shift, although please remember that this was made to fit a woman who is of average size.
 ). I used an awl to poke a hole in the muslin and outline the hole with a thread line. I then just overcast the hole (no buttonhole stitch needed since I didn't cut the threads of the fabric). See the diagram below for an illustrated guide to making eyelets. Both eyelets were very small, probably between 1/8" and Ľ" in diameter. After I worked the eyelets on both shift bodies, I laid a length of cord on either side of the eyelet and fed the ends out the eyelets, being sure to leave a small tail out the side that would be sewn to the sleeves (this way it will be caught and secured when I stitch over it later on). I then stitched down the turned-under edge by hand using a running stitch.
 Here's the lengths of boning I used: