 An invitation to a Renaissance Faire and a great fabric find on the bargain table of a local fabric store set the wheels in motion for this project. I happened across a little over 4 yards of creme polyester crepe for only $3.00 a yard--something I had been keeping my eyes open ever since I first saw The Lord of the Rings: The Two Towers. I fell in love with Eowyn's cream wool gown, and have been dying to make it ever since. I'm making the gown for my sister, who happens to look fabulous in this style of dress. She's also very petite, which means that I think I'll just be able to squeeze the dress out of the fabric. I'm banking on being able to fool around with grainlines some, as the fabric is 60" wide and the perfect width to cut the dress out of. There are a few 'issues' though, mainly that the Ren Faire is quite soon and that we are on an extremely tight budget. This means we're cutting corners on some things for right now. Mainly things like the belt will not be beaded but rather have trim applied. Otherwise, we're trying to stay in the spirit of the original design. I've already decided that I'll probably be re-doing the dress in the future; when I have more time and money. I've never been formally trained in how to drape a garment, but I think I've pretty much figured out the basics from a couple of Threads issues, a 1920s sewing book, and experimentation. To drape the basic kirtle pattern, I simply set my dress form to my sister's measurements and pinned two long lengths of muslin to the form at the shoulders. I only pinned muslin over half the form, as I'll make up a full toile later. I made sure that I had pinned the muslin down along the center of the form to keep it from shifting. Using pins, I pinned the two pieces of muslin (front and back) at the side seam, shaping it to the curves of the form as I went. Then taking a ball point pen I marked the neckline and armholes and cut those. With the pins still in the side seam, I cut down the seam to about 2". Next I tried the muslin on my sister and noted some tweaking that needed to be made. I then marked the adjustments and the seamline that the pins indicate. That gives me my basic 'pattern' from which I can cut my next toile. I've probably made it seem very complicated, but I learn visually so it's a little hard to describe. I did take a couple photos while draping, and have compiled them on a page here, along with a few comments. I made a total of three toiles before I got the gown just how I wanted it. The next order of business was to drape the sleeves, which was relatively easy. Sleeves are not a favorite of mine, but draping this one was certainly easier than drafting it. I simply had my sister put on the gown toile and then took a piece of muslin, found the center along one edge and placed that on the shoulder seam. I next started pinning the muslin around the armhole and then pinning what would be the underarm seam. I was quite pleased with the finished sleeve. It didn't need much in the way of tweaking, which was fine with me since I was running out of time to continue to fool around with the pattern. Construction was quite easy considering that the gown itself consisted of only three pieces, and the sleeves four (both sleeves and then the linings). Just very basic sewing here. Although with the sleeves I attached the trim and lining by hand (I love doing handwork!! The only difficulty with the fabric is that it never wanted to iron flat. That makes the dress look horrid when it's not on the dress form or my sister, but otherwise one doesn't notice it much (I'm such a perfectionist anyway! The one thing that gave me some consternation was how to finish the neckline. As I didn't have the trim (see "Embellishments", below) finished in time, any facing would show. In the end I just ended up using white bias tape, sewn to the edge, understiched, ironed under the edge of the neckline and secured with miniscule hand-stitches. A lot of work... LOL! Click on the thumbnails below to view pictures of the pattern cutting process. 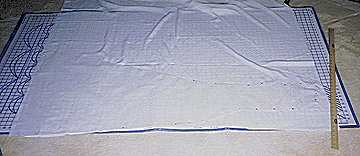 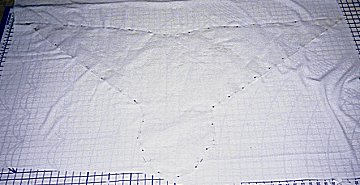 As I mentioned above, the embroidery for the neckline wasn't complete in time for the Faire. I had decided to embroider a strip of the dress fabric with the neckline design and then apply it to said neckline. However, I seriously underestimated the time it would take me to do this and got started way too late in the game. (Lesson: always start the hardest parts first and then move on to the easier things like construction.) It looks beautiful, but I detested having to sit around all afternoon embroidering while I knew there were other things that needed to be attended to. The embroidery will be completed at a later date, unless we find the absolutely perfect trim at a fabric store. I also added a narrow gold trim to the sleeves; right over the line between where the lining and dress fabric meet inside the sleeve. It looks very nice and very much like the original. I also added trim to the sleeve shoulder seams after I sewed the sleeve to the dress, and, as a concession for the embroidered trim not being round the neck, I added a little of the narrow gold trim there too. The belt was fun to make. I simply made a pattern for the belt that goes round the hips and then measured the length of the 'tail' (if you will). I made both the belt and tail 2.5" wide (plus .5" seam allowances). I used the dress fabric for the front and some twill for the back, to give it a little more 'body'. I was unable to take the time needed to embellish the belt like it was done in the movie, so instead I sewed some of the narrow gold trim I used on the neckline and sleeves to the belt. It still looks very good, and suggests the movie gown. To view pictures of the completed dress, please click here. Though at time of writing the dress has not been officially completed, I think it was a great learning experience. I got to become more confident in my draping skills (or lack thereof! Home | News | Diaries | Articles | Links | Site | Map | Contact Me All Content Copyright © 2003-2004 Miss C. |
Modified March 1, 2004 Contents Inspirations Because of copyright issues, I'm not able to post stills from the movie here. However, here are a few links to pages pertaining specifically to this gown. Alley Cat ScratchThe Movie Mannequin. Supplies ° Cream cord ° Narrow gold trim ° Invisible zipper ° Silk Essence, 3 yds. Sources Resources ° LotR Costume Discussion List ° Katherine's Eowyn Gowns ° Michaela's White Gown ° Movie Mannequin ° Elizabeth's Eowyn Gown Movies to Watch |
 ), since it was easier for me to control how it went in. Although I looked high and low for the right material for the lining (a cream/gold brocade), none was to be found in any of the stores in my area, so I ended up just buying some buttery cream colored 'silk essence' at JoAnn's, which looks very good--for a substitute!!
 ). I used a simple invisible zipper up the back of the dress.
 ), and the gown looked gorgeous on my sister. I've never tried to reproduce a gown from a movie, and this was a fun project to do from that point of view. I must admit though, that I do prefer to work on my own designs, as while I was sewing this I kept thinking of ways to change this or that.