Gown
The gown is basically being remade from the ground up. Although the skirt will still be two 60" panels (simply because I don't have enough extra material to make it any larger), but they will be box pleated to the bodice instead of gathered. The bodice is a totally new one; draped (see pictures below) and cut out of leftover fabric. There will also ben sleeves--which I think will be a distinct improvement over last year's gown!!
June 28. 2004
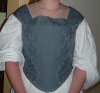
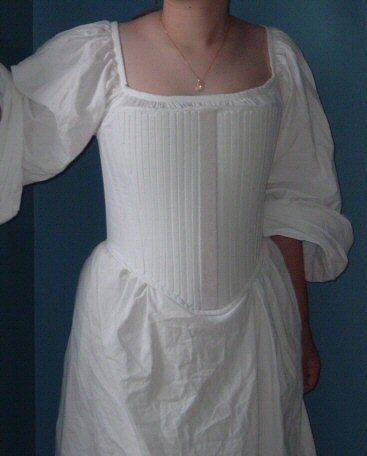
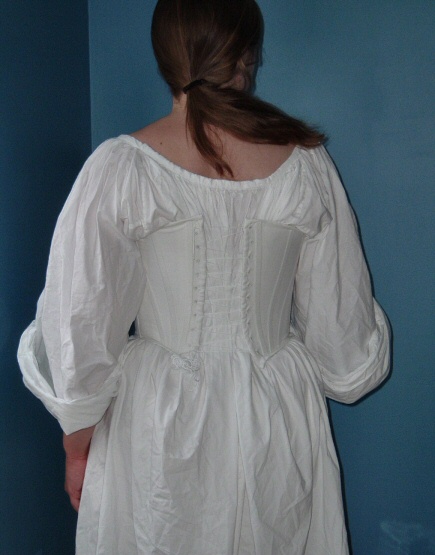
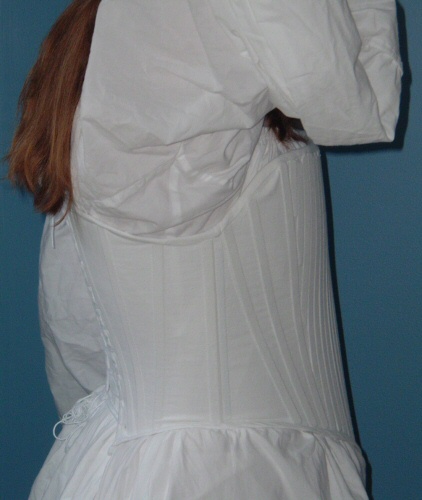
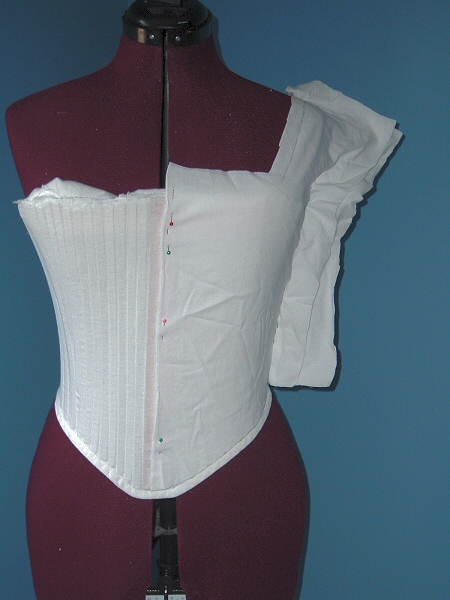
I draped and fitted the bodice pattern yesterday, and cut out the fabric and lining this morning. I'm going to flat line the bodice, but first I need to apply the gold trim to the neckline.
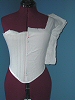

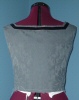
I basted the bodice together to try on because I couldn't wait to see what it looked like! ;) The neckline needs to be lowered a touch, and all the edges still need to be turned under, but this gives one a good idea of what it'll look like in the end...
June 30, 2004
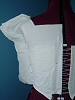
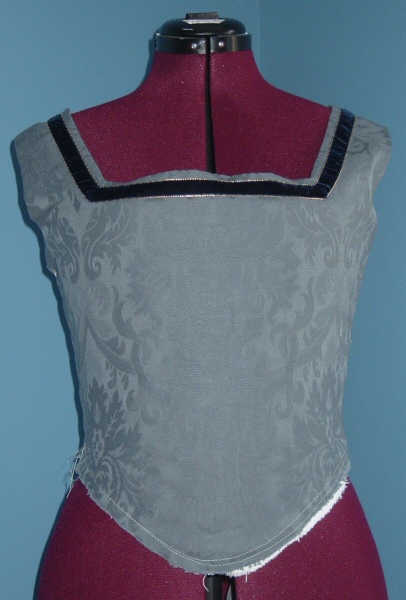
I pinned on the gold cord I had purchased to see whether it worked or not. I was trying to go for the effect here, minus the more complex center pattern. Basically just two gold bands. Needless to say, it doesn't look terribly interesting:

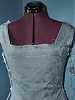
(Note: I apologize for how sloppy the bodice looks; I have the skirt pinned to the dressform as I'm trying to decide the widths of the pleats.)
So, my options are:
- Use the narrow gold trim, but carry out the more ornate scroll pattern. This would mean probably echoing it on the sleeves as well. The only problem is that I don't have all the time in the world, and I think it would be overkill on the sleeves.
- The other option is to try to find a narrow flat braid like this and use that in one row on both the bodice and sleeves. The questions that arise from this option are: can I even find anything remotely similar at JoAnn's? Should I go with the gold, or try for something like cream?
- The final option is to nix these ideas all together and go with something totally different. Something more along the lines of here. Maybe I could find a braid or ribbon of a darker shade of blue and use that?
July 1, 2004
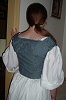
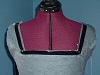
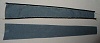
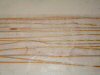
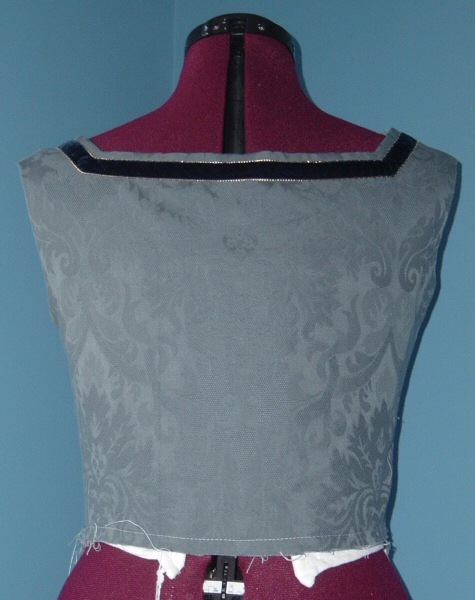
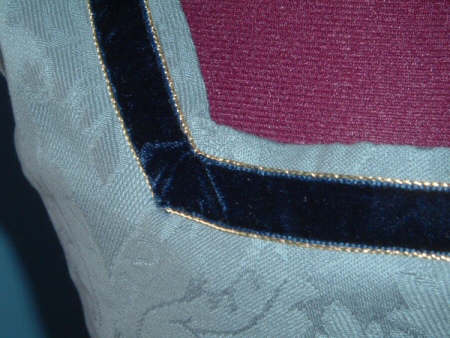
I went shopping this morning, and as luck would have it found some trim suitable for my costume! I chose a navy blue velvet ribbon (as suggested by Jenny la Fleur), and purchased some more of the narrow gold cord to flank either side of the ribbon. I have to say I had my doubts about the ribbon working, since the blue of my gown had a grey undertone and when I tested the ribbon against the fabric in the store, it didn’t look that impressive. Once I put the gold next to it though, it looked great! I’m so jazzed!!! I pinned both the ribbon and cord to my bodice, and took a few photos to share. Now, let me first say that I will be spacing the ribbon further away from the edge of the bodice, but I just wanted to see how the combination looked on the bodice. Secondly, the photographs really don’t do it justice—it looks very stunning in real life!!

I did work on my sleeves yesterday, drafted a pattern and made a muslin. As is typical for me, the sleeves were way too small. I figured it could use about 4” or 5” more inches around (they would fit my bare are perfectly, but with a camica underneath, it’s a little too snug ;). I have decided to do the ribbon/cord on the sleeves as well, only using a narrower ribbon. I don’t think that 5/8” would look too good! I still need to find blue cord to tie the sleeves to the bodice, but my JoAnn’s had every size and color imaginable but the size I wanted in navy blue. Will have to go hunting somewhere else…
July 8, 2004
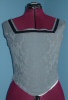
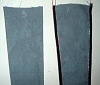
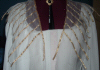
The ribbon and cord have been sewn in place on the bodice, and here is the final result:

I made up another sleeve toile this afternoon, and now it's too big! However, too big is better than too small, in my book. So my next plan of action is to slightly adjust my pattern, cut one sleeve out of the fashion fabric, and adjust it further as needed. Hopefully, it'll work out. *keeps fingers crossed*
July 12, 2004
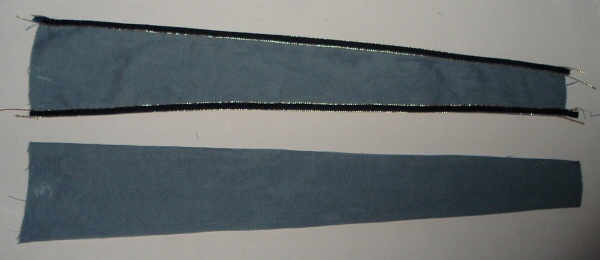
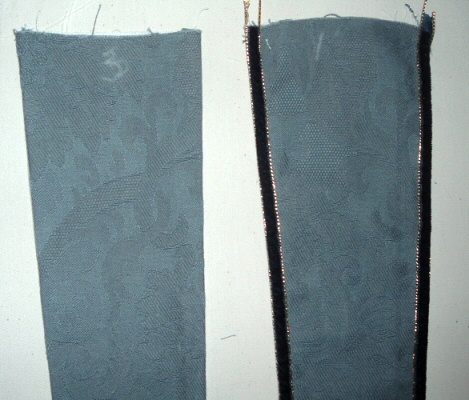
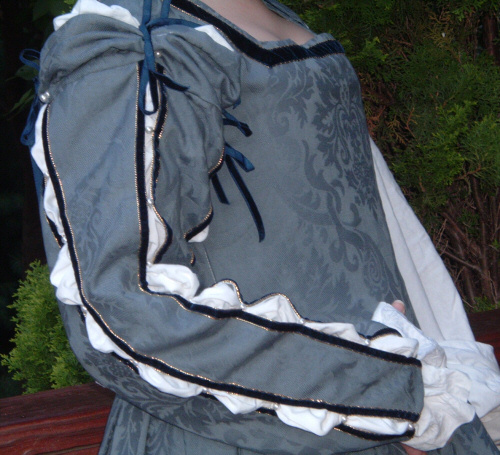
I've been slowly working on my paned sleeves over the weekend. I managed to get the pattern to fit correctly, though it still looks odd to me because it's so loose fitting compared to what I'm used to in sewing. But heck, it looks like the Eleonora of Toledo portrait, so I'm satisfied. I've managed to sew two of the panes to their appropriate linings and am working on attaching trim at this point. As I curled myself up in a nice comfy chair, put some good music on and started to sew, it hit me. Each sleeve is made up of 4 panes; each pane has two strips of velvet ribbon (one on either long edge) and 4 lengths of gold cord (2 flanking either ribbon). That means I have 8 ribbons and 16 cords to sew by hand on each sleeve. In the words of my favorite Harry Potter character, Ron: 'She's gone completely mental' (paraphrased)! So, my plan is to work like mad on one sleeve, get the lining attached to the fashion fabric on the other, work on attaching the skirt and do the finishing touches on my dress; all the while working in little fits and starts on the second sleeve.
July 13, 2004
I finished trimming one sleeve pane (1 down, 7 to go!! :D Yeah, like that makes me feel any better. lol), and here is the result (pictured next to an untrimmed pane):
It looks a little corny at this point, but I think once with all panes are finished, attached to each other with pearls and tied onto the bodice it'll really look good.
July 19, 2004
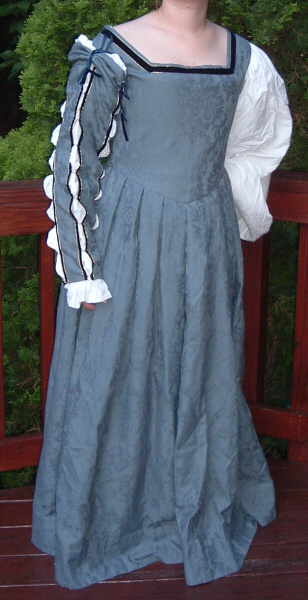
I spent a good deal of Saturday and yesterday working one the first sleeve. After sewing on all that trim, attaching the pearls and ribbons, I'm so happy it's done--but I'm dreading all the work of the next one. The sleeve turned out very similar to the Eleanor of Toldeo painting. I also managed to pleat and attach the skirt (which took a couple hours as I messed up the first time!) I got some pictures:


I have to admit, I have very mixed feelings about the sleeve; maybe I'll like it better once I have the other finished. I think this is mostly due to the fact that it took me so long and I spent many hours the last few days working on it; I feel like all my life is revoloving around sleeves!  For right now though, I'm going to take a break for a couple days and try to recharge my enthusiasum for this project. I'm also waiting for the silk gauze I ordered to get here; once it does I'm onto making the parlet and hairnet.
July 20, 2004
Okay, I said I'd take a couple day break from sewing the Italian gown, but I find that hard as I tried, I couldn't keep from thinking about it; and thinking about and not doing usually drives me mad... So today I'll probably start work on the other sleeve.
I was looking at Jen Thompson's most recent dress diary and read about how she faced the top of the skirt with flannel to pad the hips. I'm wondering if doing something similar might add some 'lift' to my skirt. At this point, it just kinda hangs limply and looks pretty pathetic, imho.
August 23, 2004
I finally found the navy blue velvet ribbon that I've been searching for to use as ties for my sleeves. Of course, because I bought it from a local chain, it costs 2 times as much as JoAnn's, but we're not going to go into what I think of JoAnn's. Suffice to say, I'm one *very* happy seamstress who just can't wait to finally sew the ties onto the sleeves so they'll be *done*!
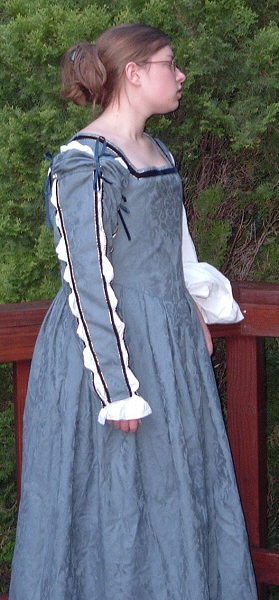
August 31, 2004
Pictures of the finished gown (with the fancy hairstyle!) are now available in the gallery. The gown is completely finished, and I'm very pleased with the end result. It looks exactly as I wanted it a year ago, but didn't have the time to do. It was surprisingly comfortable--considering the corset is boned with plastic and it was rather hot and humid at the Faire. I did end up taking my fancy sleeves off during the afternoon, but even without those the gown didn't look too bad. The whole process, even taking into account the little 'hiccups' I had with the accessories along the way, was well worth the work and effort.
Accessories
July 20, 2004
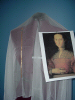
I got my silk gauze in the mail yesterday (ordered from Dharma). *drools* This stuff is unbelievably transparent, which is of course just what I wanted for the partlet. Now my problem is that the gold ribbon I bought (20 yards total; both for the partlet and hairnet) dissapears when it's against the gauze. So I think I need to go shopping and try to find some metallic gold flat braid. My JoAnn's doesn't have anything even slightly resembling flat gold braid, and if it does, it's 1/2" wide or there's only 2 yards on the spool. *grumble*
July 23, 2004
I went shopping today and popped in a local fabric store, and of course, they didn't have any gold trim I wanted to trim the partlet with. Well, they did, but it was 3/8" wide and I really want 1/4" wide. Not to mention it was a really gaudy shade of metallic gold and would have needed to be toned down a bit. So... I'm back to square one. Behold the Very Unhappy Costumer (tm).
But my visit wasn't in vain; I found a 1 3/4 yard piece of sage green cotton canvas on the $0.99/yard table. Woohoo. For under $2 I got a nice piece of fabric that'll work well for underlining something... who knows what at this point. ;) Probably a corset... or maybe stiffening for a forepart?
July 28, 2004
I finally did find 1/4" wide gold ribbon that will work on my partlet and net. *does happy dance* I found it at Michael's of all places; in the floral section. Now, someone tell me why I can't find decent gold ribbon at JoAnn's--a store for sewing, but I can at a craft store? Come on, people! The gold is just a little too gaudy, so I picked up some brown fabric paint (the nice stuff; not that junk that kids use on t-shirts and plan to dilute it to help tone down the brightness of the gold. I plan to spend my evening doing that.
My newest frustration, however, is trying to find a pendent to attach to my pearl necklace I plan to wear. I've checked every concieveable store I can thinks of--even looked in a couple of second hand shops and Michael's while I was there today. I came close, but nothing that was worth using. Either it looked majorly tacky, or it just wasn't 'Italian Ren' enough. Though I could kick myself for passing up a $1.00 gold chain necklace at a second hand shop that would work for an Elizabethan accessory. Just because I didn't have any cash on me. I'm so lame. Oh well...
July 30, 2004
I finally did something useful today. I painted the gold trim with a brown wash and it looks quite good. It's still drying, but at least I've done it. Unfortunately I don't have a picture of the trim before it was painted. I kept thinking to myself 'I really need to take a picture of this', but of course was a total dork and forgot. Oh well. I do however have a picture of it drying as well as a sample piece with the silk gauze.
I'm going to make a muslin mock-up of the partlet to test before working on my gauze. Though the gauze is pretty, I can forsee how it will probably be frustrating to work with.
August 21, 2004
I've spent a good deal of my free time this week working on the finishing touches for the Italian gown. All that remains to be finished is the padding layer added to the skirt, and the net caul and fan need to be made. I changed plans earlier in the week for the shape of the partlet and decided instead of doing a small stand-up collar, to just do the same neck covering shape as the Eleanor of Toledo portrait. I worked on the partlet, and got it about 60% finished, but have decided that for right now, I'm not going to wear it. The silk gauze and I just didn't work out together and although the gold ribbon looked nice stitched on top of the gauze, the stupid silk split in some places.
So, I won't be wearing any kind of neck covering at the Faire, simply because I don't have time to make another one. At this point, my spirits are pretty low, and I'm feeling very cynical about the whole thing. I'm worried my idea for the net caul won't work (using the ribbon to create the 'mesh') and I'll be stuck with a half-hearted attempt at a costume again this year. At least I'm going twice, so if everything isn't finished this time round, it will be next time. But right now, I'm starting to really hate this costume. I think I just need to take the evening off and try to get everything in focus again. Maybe I'll work on the fan--hopefully that won't be too complecated. :p
August 23, 2004
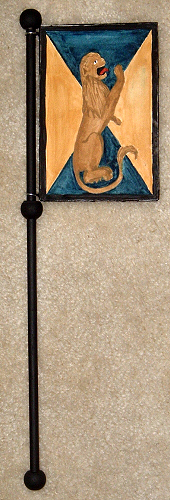
I made a flag fan last year, based on the instructions here, but mine didn't rotate (which was not a good thing because my hands were raw at the end of the Faire from twirling it) nor was it particularly artistic or pretty to look at. So, armed with some art supplies (water colors and Bristol board) I spent most of Sunday designing and then painting the Bristol that will be applied to the flag fan base later on. Let me first say that this fan is pure Medieval/fantasy, and really isn't historically accurate at all. My original idea was to have a unicorn on one side and a diamond design on the other with several symbolic plants. But my Anglophile sibling convinced me to do a lion and unicorn. Having been very fond of Alice in Wonderland book (or was it Alice Through the Looking Glass that had the lion and unicorn? I can't remember...) growing up, it seemed a nice, personal touch to add to my costume. So I found a French Medieval tapestry online, traced the lion and unicorn from that (I can draw people but not animals!), transferred them to the Bristol and painted away. I was going for a very primitive look, this it isn't 'perfect'.
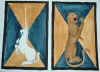 All I need to do is trim the edges down (thus the outer black band is very uneven at the moment) and then apply it to the wood flag base once I paint the edges of that black. I'm rather pleased with how it turned out. I love the gothic/Medieval style of art, so this is really a fun accessory for me to add to my outfit. :) More flag updates will be forthcoming throughout the week!
August 26, 2004
I finished the flag fan this morning; well almost. It turns out that we had another drill and my dad helped me do all the drilling (I'm such a klutz with power tools; I really have no clue how to use them). All that needs to be done is the glue needs to dry for a couple hours from gluing the paper to the flag base; it needs a few touch-ups with black paint and then I need to spray the whole thing with finish. Isn't it cute?


Home | News | Diaries | Articles | Links | Site | Map | Contact Me
All Content Copyright © 2003-2004 Miss C.


