

Click on thumbnails to enlarge.
A neat broadcloth skirt is a desirable addition to every wardrobe, but many women hesitate to get one because of the expense of making, adding to the price of the material, seems to large an outlay for one item. But any woman who can sew at all can make such a skirt herself with a little instruction, and in that way so reduce the cost that she need have no compunctions of conscience about getting it. I have chosen a skirt of this kind for that reason, for if you are a woman of moderate means I am sure you will be glad to learn how to make a skirt of the beautiful broadcloth which will be so fashionable this winter.

The skirt we will consider in this lesson is McCall's Ladies' Four-Gored Skirt No. 4909. It is beautifully illustrated in figure 1, with waist No. 4785 completing the up-to-date costume. The skirt in this size, waist measure 28, will require two yards and a half of broadcloth of the regular width, fifty-four inches. If you make the waist, too, you will need only four yards altogether for the waist and skirt as illustrated in figure 1, as parts of the waist can be cut from the pieces left from the skirt; whereas this waist alone requires two yards and a quarter of fifty-four inch goods. It would pay you to make the both, for with little extra expenditure of money and time you can have a dress which will give you good service all winter. By lining the waist the dress will be warm enough to wear without other wrap than the furs, as represented here, except, of course, in very severe weather.
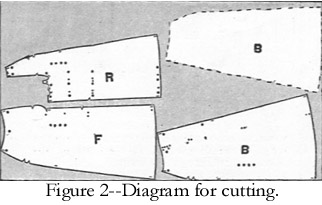
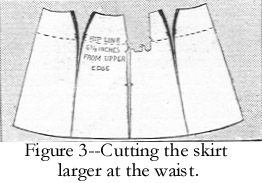
Buy your pattern by your hip measurement. If you are not perfectly proportioned it will be a simple matter to cut the waist larger, as illustrated in figure 3, or to make it smaller by taking up larger seams at the waistline. Measure the length of the pattern, and if it very much longer or shorter than you need, make the necessary alterations by cutting through the pattern twelve inches below the regulation waistline, and lap the parts to shorten, or lay them as far apart as will be necessary for the desired length. The skirt has four gores, right front (marked F), left front (R), and back gores (B). You must study the cutting diagram, figure 2, carefully; before laying your pattern on the material, for I have shown it in a different arrangement this time than heretofore. Instead of leaving the goods folded and cutting both sides of the skirt at once, I find you can cut this pattern to better advantage by spreading your goods full width on a wide table and cutting each piece separately. Ascertain the up and down of the broadcloth and cut all pieces with the nap downward, so that the effect of light and shade will be the same on all of them. Cut the left front (R), right front (F), and one side of the back piece (the piece B indicated with solid line); then unpin the B piece and lay it again on the material as indicated by the dotted line, and cut the other side of the back. We will make our skirt with the raised waistline, so pay no attention to the line of the large circles (l) which marks the normal waist. Cut all the notches (>) and mark the long perforations (-), the large circles (l), and the small circles (l) given as guides for making the skirt.
This skirt may be closed either at side front or center back. As we are making it with the side-front closing, it will be better to make the back in habit fashion than with the inverted pleat, which is also provided by the pattern. For the habit back cut off the extra allowance of material at the back edges of the back gore at the line of double small circles (ll), and baste the two edges together in a seam three-eighths of an inch wide. Before basting the other gores together you must lay the pleats which you see at the right of the left-front gore. Crease your material at the small circles (l), bring the creases over to the large circles (l), baste the pleats from top to bottom, and then stitch them down as far as the double circles (ll). Press on the wrong side with a hot iron under a damp cloth. Remember to leave the basting threads in to hold the lower parts of the pleats in place until the skirt is completed.
Let me repeat here what I said in the October lesson about pressing. Press with a heavy iron and with force, and remember that you cannot press too often if you would give your sewing the smoothness and good finish of real tailored work.
Baste left and right-front gores together from the bottom to the top of the pleats in the left, or R, piece, matching the notches (>) exactly and keeping the edges even. Stitch the seam along the line of the long perforations (-). Fold under the edge of the upper part of the right-front gore three-eighths of an inch from the top, and around the curved extension, and baste evenly. Then crease the right-front gore along the line of small circles (l) near the seam, and fold it over to the first row of large circles (l) on the left front, to make the pleat which conceals the seam joining the gores. If this pleat is laid properly, the curved extension you see in the pattern and in figure 1 should lie flat across the top of the two pleats in the left front. Baste this down and then stitch around the extension from the notch (>) and down the pleat to the two small circles (ll). Press as you did before. Leave the bastings in this pleat, also, to the bottom, until the skirt is finish, that it may not be pulled out of shape in the handling.
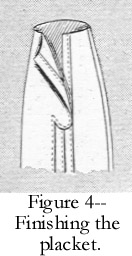
Leave the lap free above the pleats for the opening or placket, and after your skirt is fitted finish in the usual manner, by facing the right front and stitching an under-lap to the edge of the left front. Figure 4 illustrates the correct finish for the placket.
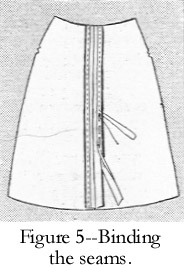
Baste front and back gores together and try on the skirt for fitting. Fit the gores carefully over the hips, but remember not to make them too snug, as with the raised waistline there should be a little spring in the material out over the close fitting canvas belt beneath. Stitch the seams, trim the edges even and press them open-then bind the edges with a narrow silk seam binding which you can buy by the yard for the purpose. Figure 5 shows how the seams should be bound.
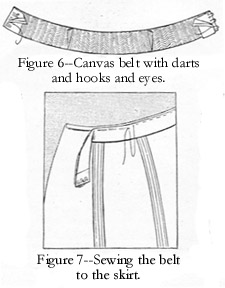
After the seams are bound, you must attach the skirt to the belt. Buy canvas belting for the purpose, cut it to fit your waist snugly, and take up a dart in each side just under each arm. Turn back the ends and sew on hooks and eyes as illustrated in figure 6. Turn under the top of the skirt three-eighths of an inch and baste the belt to it with its upper edge one-eighth of an inch below the fold. Place the center of the belt at the center back of the skirt, and the closing of the belt at the center front. Face the top of the right front of the skirt, from the center front where the belt stops to the edge of the lap with a bit of bias silk or lining material about an inch wide, catching the facing to the broadcloth with invisible stitches. Stitch the skirt and belt together along the upper edge of the belt and continue the stitching over the facing to the outer edge of the laps. This makes a row of stitching all around the top of the skirt and about an eighth of an inch below the upper edge.
Now put your skirt on, and, standing on a table, have some one get the proper length for you and put a row of pins to indicate an even line around the bottom. Trim the lower edge of the skirt by the pins, allowing for a seams of three-eighths of an inch in stitching on the facing. Cut a bias strip three inches wide of material, either your broadcloth or a lighter weight woolen goods exactly the matching color, and stitch it to the lower edge of your skirt. Turn up on the wrong side, turn under the upper edge three-eighths of and inch, and baste in place with close stitches. You will have to take the bastings out of your pleats for a sufficient distance up to allow the facing to go on easily, but pins can be put in to hold the pleats and prevent the basting threads from becoming loosened any further. After your facing has been basted you should press it with a hot iron under a damp cloth, and then stitch it along the upper edge, making the false hem you see in the illustration of the dress, figure 1. Take out the basting and press the facing again.
Work five buttonholes in the overlapping right-front gore as illustrated in figure 1, and sew buttons to correspond on the under-lap to close the placket. Sew hooks and straight eyes at the top to fasten the extensions of the right front at the waistline. Now lightly press your skirt on the wrong side under a cloth, take out the bastings which hold the pleats in position and your skirt is done.
You will find very little difficulty in making the blouse No. 4785. I have not given you a diagram for cutting it, but if, as I suggested, you purchase four yards of broadcloth when buying the material for your skirt, you can easily lay out the waist pattern without specific instruction. You will, of course, make the waist with long sleeves, both because they are more comfortable in the winter and because, for one, Dame Fashion had stamped her seal of approval on a sensible and appropriate style of dress.
Notes on constructing in the modern day: Instead of binding the seam allowances on the skirt, if your material is of a dense enough weave, and does not ravel easily, try over-casting the raw edges of the seam allowance. If you are unable to find something that approximates the canvas belting used for the belt, I think maybe horsehair canvas used in tailoring suits may do the trick of keeping the belt stiff enough.
Note: This article was taken from a 1912 issue of McCall's Magazine. The techniques describe here have not been tried, and therefore Across the Ages cannot vouch for their work-ability. The instructions and/or patterns provided here are for your own use only, and may not be reproduced in any form for sale or commercial use.
Please contact the webmaster if you are experiencing any technical difficulties with this site.
About
Additions
Articles
FAQ
Feature
Links
Poll
Reviews
Resources
Sewing
©2003 Across the Ages